
7 TRE® Exercises: A Guide to Tension & Trauma Release
TRE® (Tension & Trauma Releasing Exercises) is a simple, body-based practice developed by Dr. David Berceli to help the body release deep muscular tension, chronic stress, and stored trauma — naturally and safely. Here is a step-by-step guide to all seven exercises, what to expect, and how to begin your own practice.
What is TRE®?
TRE® stands for Tension & Trauma Releasing Exercises. Developed by Dr. David Berceli, it is a series of seven simple exercises designed to activate the body’s natural neurogenic tremor mechanism — an instinctive shaking response that helps the body discharge accumulated stress, tension, and unresolved trauma.
When we experience stress, fear, or physical strain, the body contracts. Muscles tighten, breathing shortens, and the nervous system moves into a protective state. TRE® uses the body’s own biology to reverse that process — from the inside out, without needing to talk, explain, or revisit anything.
TRE® is practised worldwide by therapists, yoga teachers, first responders, athletes, and ordinary people who simply want to feel more at ease in their bodies. It works for anyone with a nervous system — and it can be learned and practised independently once you’ve been properly introduced to it.
Where to Seek Professional Guidance
This guide is an introduction to the TRE® exercises. Before practising independently — especially if you have a history of trauma, recent surgery, cardiovascular conditions, or are pregnant — it is strongly recommended to work with a Certified TRE® Provider first.
You may want to seek guided support if you:
- Have a history of significant trauma, PTSD, or complex nervous system dysregulation
- Experience strong emotional or physical responses during body-based practice
- Are new to somatic work and want safety and proper orientation
- Have a medical condition affecting the musculoskeletal or nervous system
A free 30-minute consultation with Anna is available if you’d like to understand whether TRE® is right for you before beginning.
Key Practice Principles
Before you begin — read this
- TRE® is always self-regulated. You are in control at all times and can stop the tremors whenever you choose.
- Do the exercises barefoot, on a non-slip mat or carpeted surface. Wear comfortable, stretchy clothing.
- Avoid eating a heavy meal in the 1–2 hours before practicing.
- When you are new to this, keep the shaking to a maximum of 15 minutes, 2–3 times a week. More is not better when you’re starting out.
- If at any point you feel overwhelmed or uncomfortable, straighten your legs out flat, sit up or walk around, and breathe in a relaxed way. Water helps too — a drink, or a splash on the face.
- If something hurts, adjust your position to take the pain away. If no adjustment works, stop.
Foot & Ankle Sway
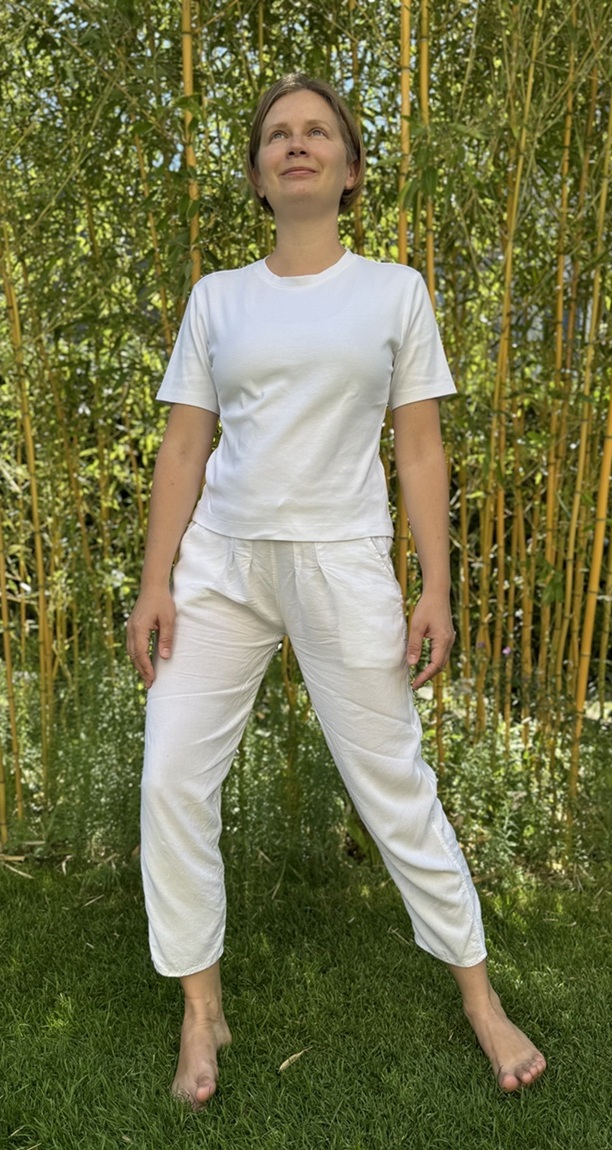
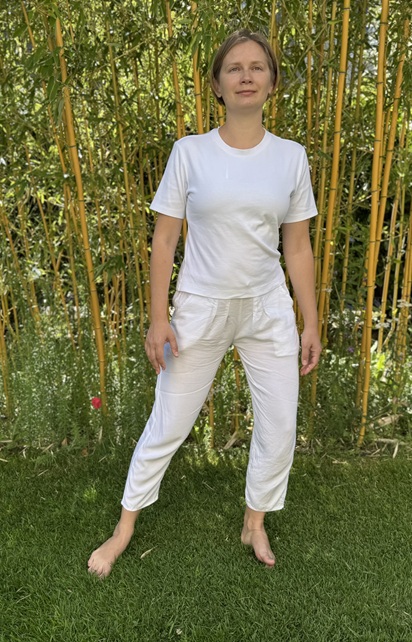
Purpose: Gently wakes up the feet and ankles, beginning to bring awareness into the lower body and preparing the legs for the exercises ahead.
Take your shoes and socks off — this works best barefoot. Stand with your feet a little wider apart than your shoulders, toes pointing straight forward. Then let your whole body sway to one side so that both feet roll in the same direction: you end up on the outside edge of one foot and the inside edge of the other. Hold there for a few seconds, then sway slowly across to the other side and let the feet invert the other way.
- Take off your shoes and socks; stand on a non-slip surface
- Feet slightly wider than shoulder-width, toes pointing straight ahead
- Sway your weight to one side so both feet roll the same way — outer edge of one foot, inner edge of the other
- Hold for a few seconds, then sway slowly across to the other side
- Continue swaying back and forth very slowly, 5–8 times in each direction
- Notice any tightness, restriction, or numbness without trying to change it
- To finish, shake out your feet
Single-Leg Heel Lifts
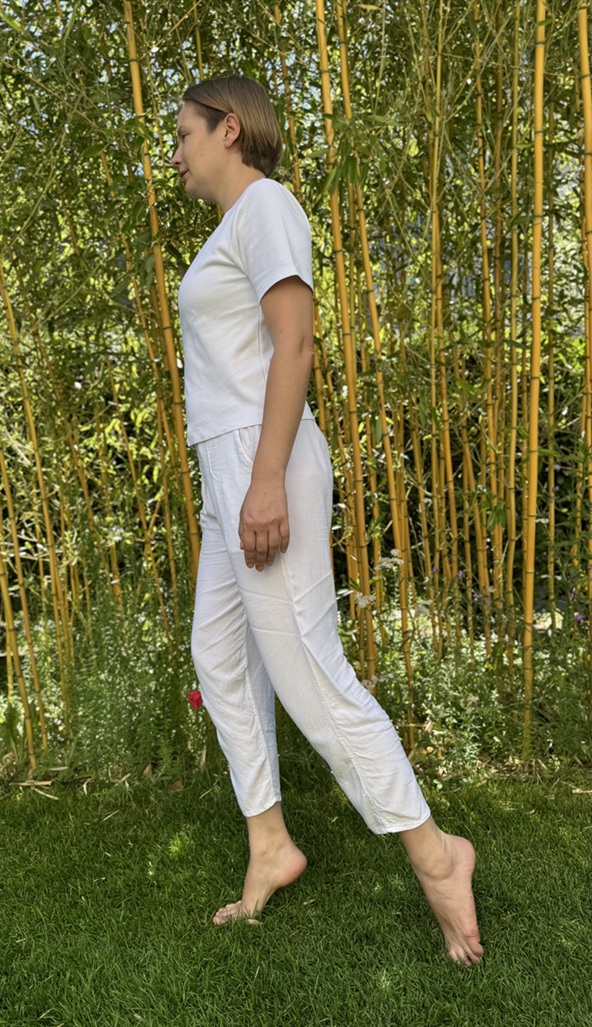
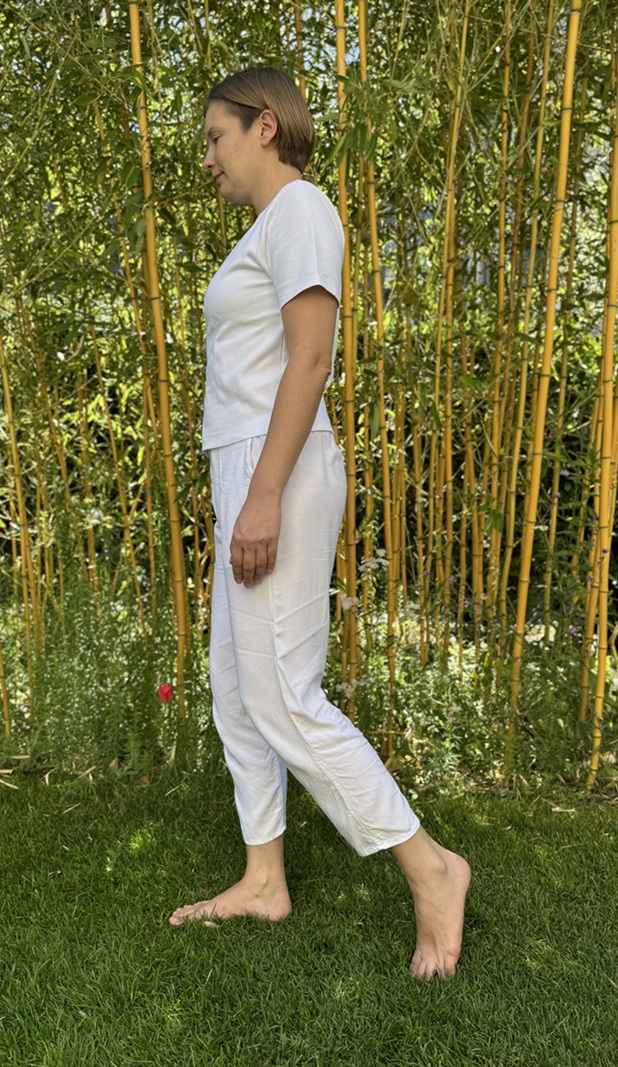
Purpose: Loads one calf at a time and begins to build gentle fatigue in the legs — an essential preparation for the tremor response later in the sequence.
This one works a single leg at a time. Step one foot in front of you and move all of your weight onto that front leg. The back leg stays on the floor only for balance — it carries nothing. Then rise up onto the toes of the front foot, lifting the heel as high as it will go, and lower it back down.
- Place one foot in front of you and put all your weight onto the front leg; the back leg rests on the floor purely for balance
- On the front foot, come up onto your toes, raising the heel as high as possible, then lower the foot back to the floor
- Repeat 5–8 times, depending on the strength and flexibility of your legs
- If it becomes painful, or you feel a burning sensation, stop
- Come back to standing on both legs and shake the working leg out vigorously to clear any pain, burning, or discomfort
- Repeat the whole thing on the other side, and shake that leg out when you finish
Forward Bend Leg Stretch
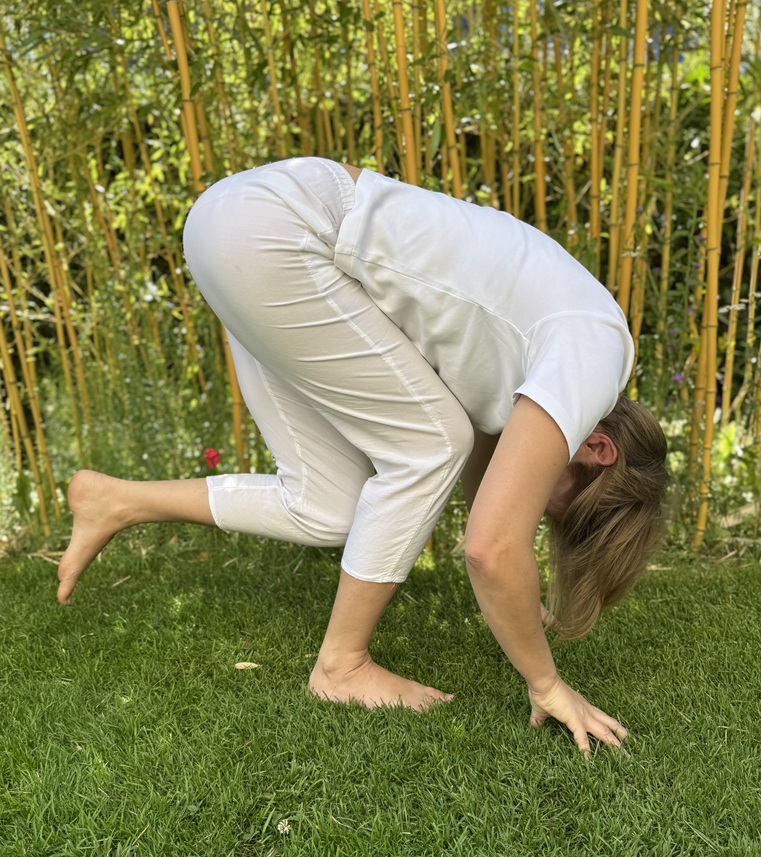
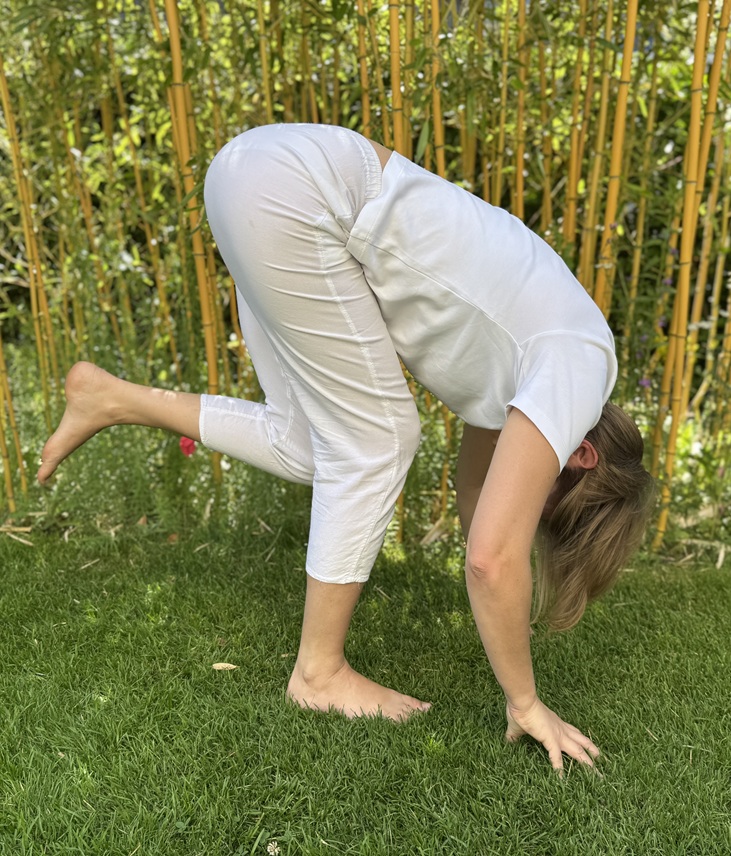
Purpose: Loads the hamstrings, calves, and lower back — regions that commonly hold chronic tension. This exercise deepens the preparatory fatigue needed to invite the neurogenic tremor.
Unlike the others, this one is a repeated movement rather than a held position. Bend slowly forward and put both hands on the ground close to your feet. From there, lower your buttocks slightly, as though you were about to sit down on a chair — this bends the knees. Then straighten the legs again, only as far as goes without pulling on the backs of the legs. Bend, straighten, repeat.
- Bend slowly forward and gently place both hands on the ground close to your feet
- Lower your buttocks slightly, as if sitting into a chair — this bends the knees
- Don’t let the knee travel forward beyond the length of the foot
- Straighten the legs as far as you can without hurting or pulling the hamstrings
- Repeat 5–10 times, depending on the strength and flexibility of your legs
If this is too much for your knees
This is a strong leg stressor and many people find it difficult or painful on the knees. There is a standing version: from an upright position, simply bend your standing knee as far as is comfortable, then straighten it again, 5–10 times. And if even that is too much, treat this exercise as optional and move on to the next one. Nothing is lost.
Wide-Leg Forward Bend
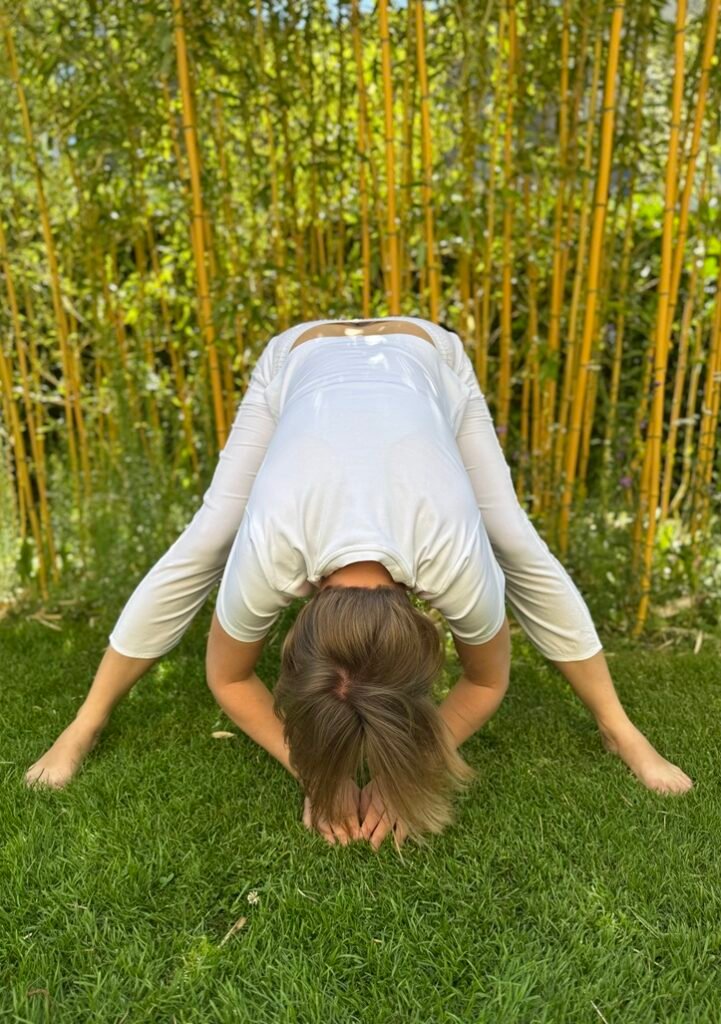
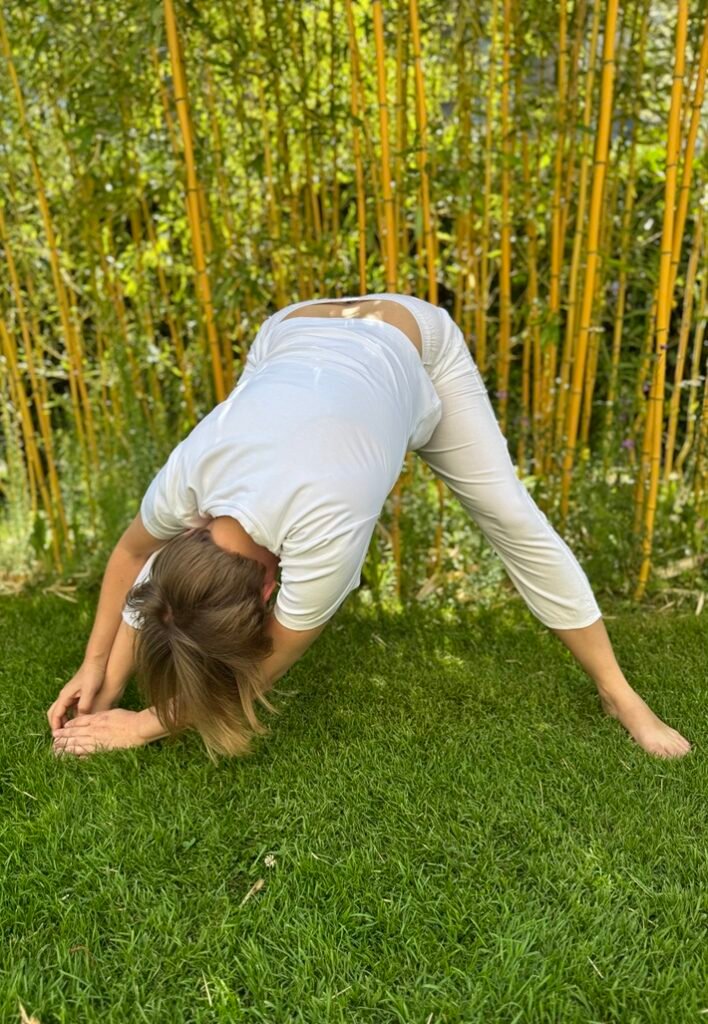
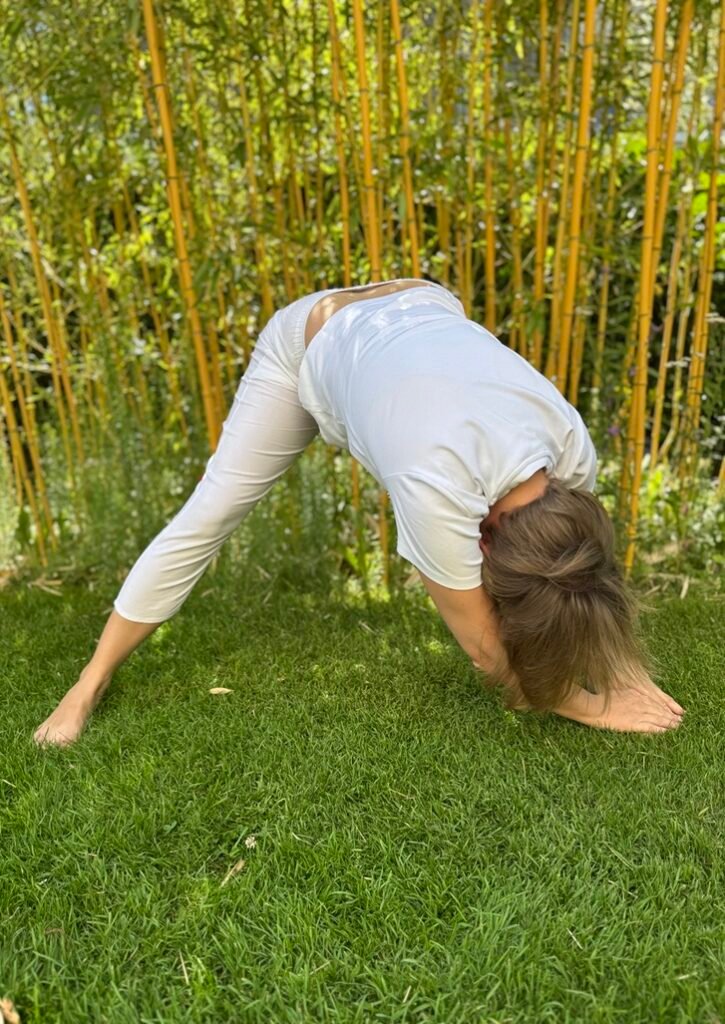
Purpose: Opens the inner thighs, groin, and hips — areas that store a significant amount of chronic tension and trauma-related holding. This variation increases the load in the leg muscles while also beginning to affect the deeper structures of the pelvis.
Stand with your legs spread wide enough that you feel a stretch through the inner thighs, then hang over forward. You don’t need to touch the ground — if that’s too difficult, it doesn’t matter. What makes this exercise work is what comes next: you walk your hands slowly through four positions, breathing three times in each one, letting gravity do all of the work.
- Stand with your legs spread apart, wide enough to feel a stretch in the inner thighs
- Hang over forward — you’ll feel it in the inner thighs and the backs of the legs
- With your hands in the middle, between your feet, take 3 slow deep breaths and let the body stretch by itself, without effort
- Walk your hands over toward one foot and hold there for 3 slow deep breaths
- Walk your hands across to the other foot and hold for 3 more breaths
- Walk your hands back to the middle, then reach between your legs behind you and hold for 3 breaths
- You may begin to feel some mild shaking in the legs. Let it happen.
- To come out, place your hands on your legs and use them for support as you slowly stand up
Front Body Stretch
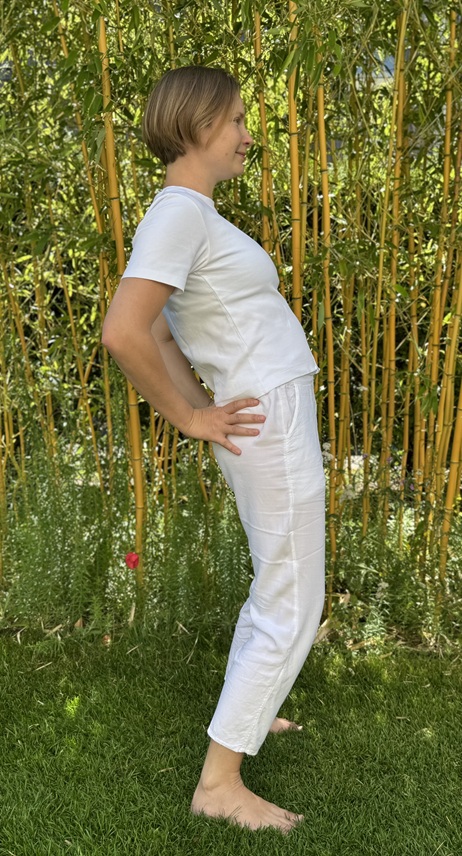
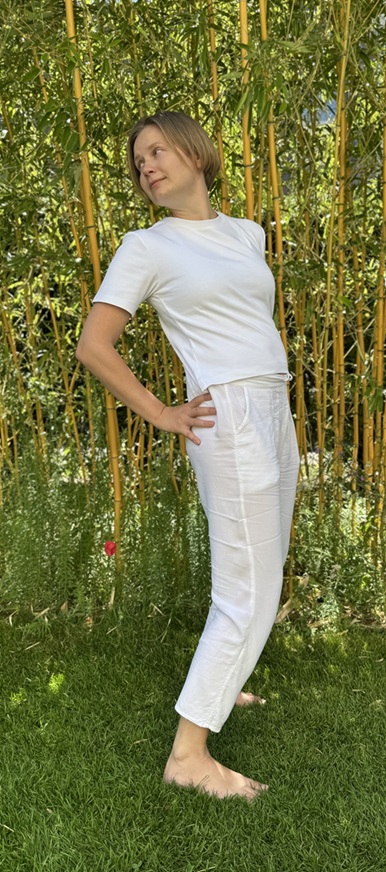
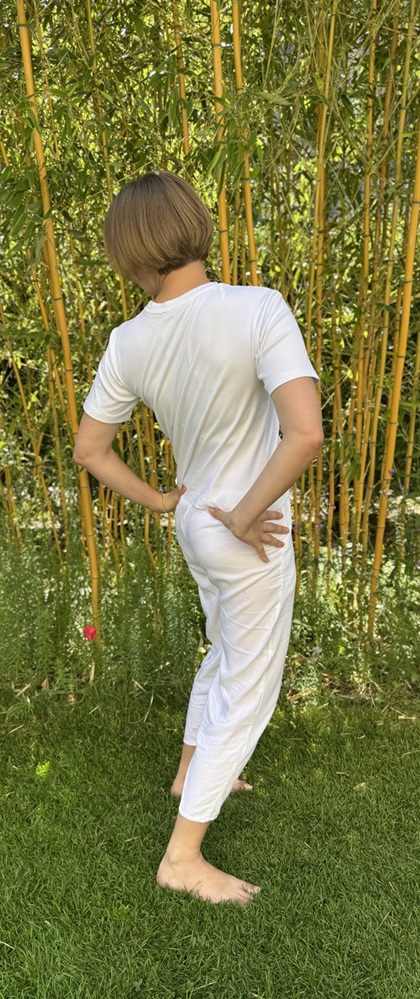
Purpose: Opens the front of the body — the chest, abdomen, hip flexors, and psoas muscle. The psoas is often called the “muscle of the soul” in somatic work: it is one of the primary muscles that contracts during a fear response, and releasing it is central to TRE®.
Keep your feet exactly where they were in the last exercise — still wide. Place your hands partly on your lower back and partly on your buttocks, so the lower back is supported. Then push your pelvis gently forward until a soft bow appears in your lower back. This is worth being clear about: it isn’t about arching your back. It’s about pushing the pelvis forward and letting the back bow on its own. You should feel the stretch at the front of the thigh.
- Keep your feet in the same wide position as the previous exercise
- Place your hands partly on the lower back and partly on the buttocks, supporting the lower back
- Push the pelvis gently forward so there is a gentle bow in the lower back — a stretch at the front of the thigh
- Keeping the bow, twist gently at the hips to look behind you in one direction; take 3 deep breaths
- Turn from the hips the other way, still holding the bow, and look behind you; take 3 deep breaths
- Return to facing forward, still bowed, and take 3 more deep breaths
- Release the bow and come back to normal standing
Keep the stretch gentle and within what your body can actually do today. There is no version of this that is improved by pushing.
The Wall Sit
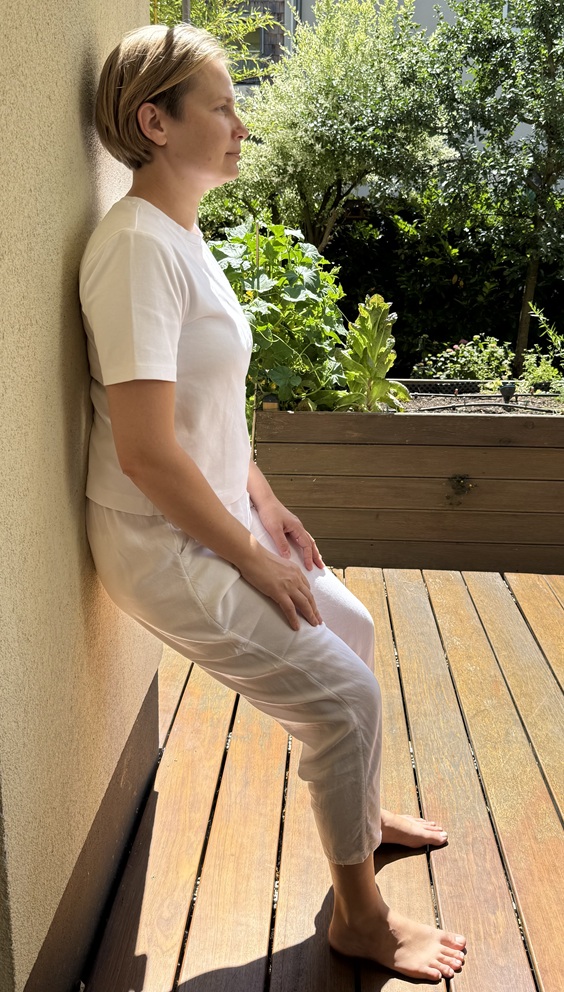
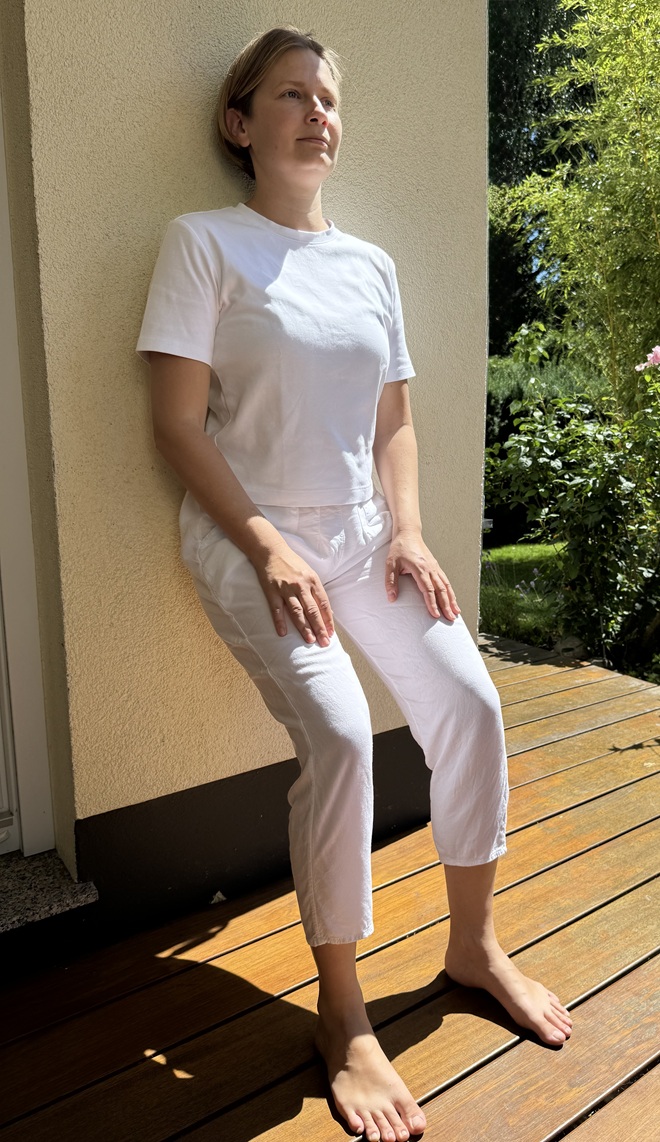
Purpose: Puts sustained stress on the quadriceps — the big muscles at the front of the thigh. For many people this is where the tremor first shows up on its own, before anything is asked of it.
This exercise is done against a wall, not on the floor. Sit with your back against the wall as though there were a chair underneath you. The weight lands in the thighs. After a few minutes you might start to feel tension, tightness, or trembling in them — and this is where the exercise becomes a conversation rather than a hold. If it starts to become slightly painful, move up the wall about two inches. The trembling may get a little stronger and the tension will begin to subside. If it becomes too stressful again, move up another two inches. What you’re looking for is the position where your legs are tremoring and there is no pain.
- Stand with your back against the wall and lower yourself as though sitting on an invisible chair — this loads the quadriceps
- Stay there. After a few minutes you may feel tension, tightness, or tremoring in these muscles
- If it becomes slightly painful, move up the wall about two inches — the shaking may increase while the tension eases
- If the position becomes too stressful again, move up another two inches
- Keep adjusting until you find the place where the legs tremor and nothing hurts
- After 3–5 minutes of tremoring, come off the wall and hang over forward, knees slightly bent, hands toward the ground if they reach
- The shaking will most likely increase here. Stay for about one minute if you can
Hips Up
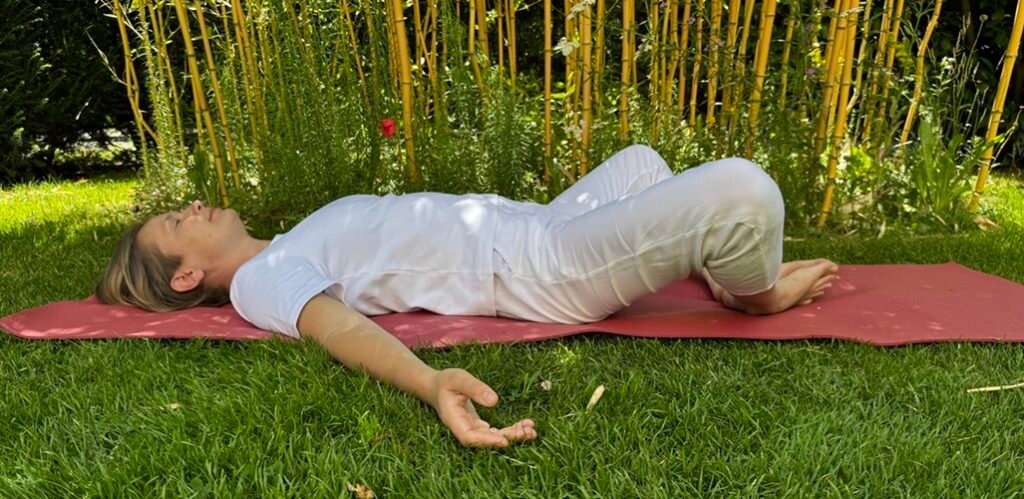
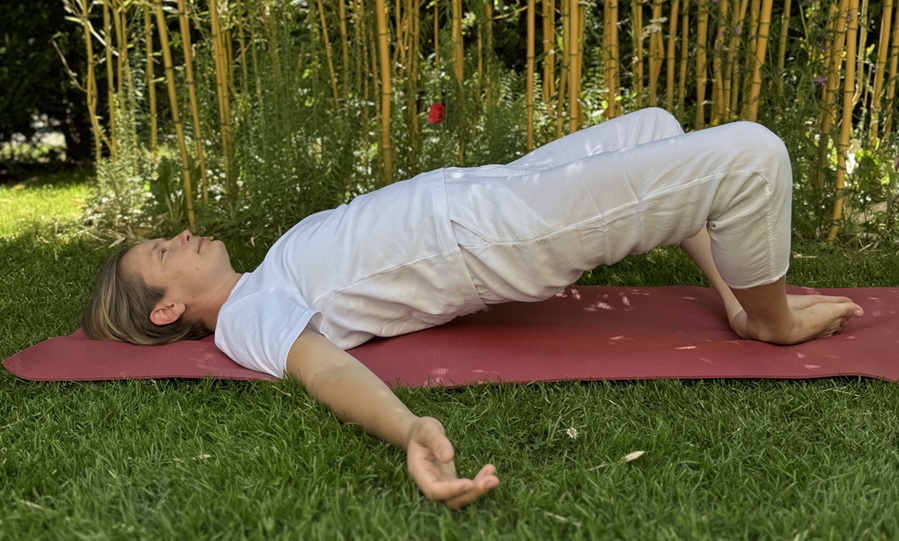
Purpose: The last of the seven. A short pelvic lift that loads the legs and pelvis one final time, then releases them — and it is usually in that release, lying still, that the tremoring first arrives.
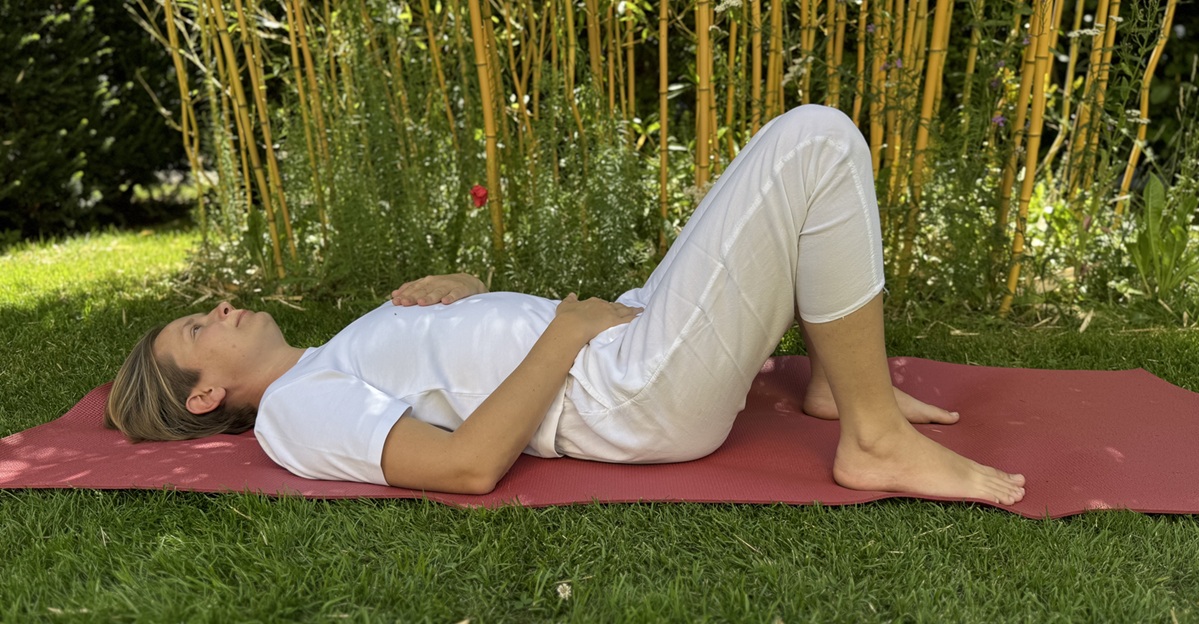
Lie down with the soles of your feet together and your knees gently relaxed open, resting. If your knees don’t open comfortably, that’s fine — keep your feet flat on the floor with the knees pointing straight up instead, as in the second picture. Both starting positions work, and everything that follows in the final step works from either one.
This is the last of the seven exercises. What comes after it isn’t an eighth exercise — it’s the part the other seven were preparing for.
- Lie with your feet together and knees gently relaxed open. Or, if the knees don’t open, feet flat on the floor with knees straight up
- Lift your pelvis off the ground and hold for 30 seconds to one minute
- Gently set your pelvis back down and let the knees rest — open or upright — for one minute
- You may begin to feel some tremoring or shaking in your legs. Nothing needs to be done about it. This is where the exercises end and the tremor begins
What if the tremors don’t come?
That’s completely normal — especially in early practice. Don’t force or manufacture shaking. Simply continue to breathe and stay with the position. With regular practice, most people find the tremor response develops naturally over time.
Starting the Tremor
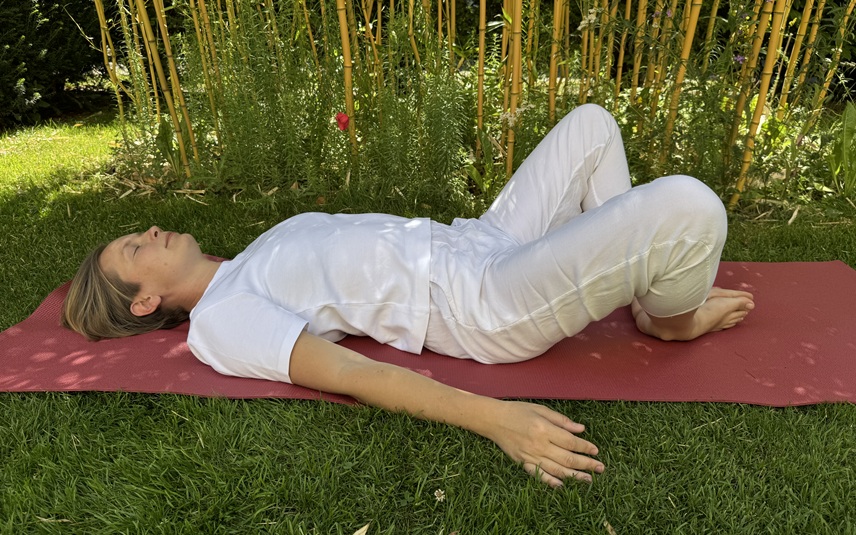
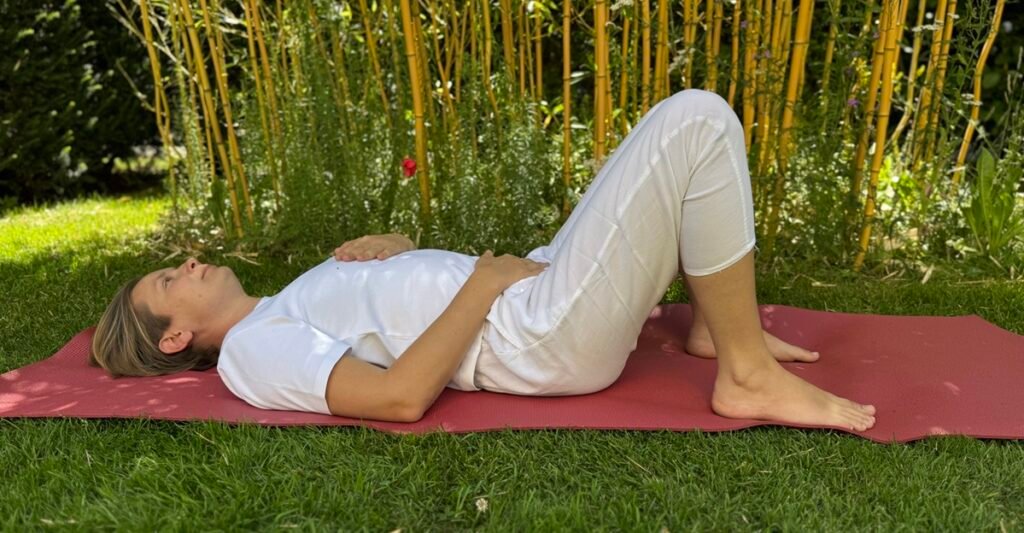
Stay exactly where Exercise 7 left you. Nothing here is an exercise in the ordinary sense — you are not loading a muscle or holding a shape. You are making small adjustments, two inches at a time, and then waiting to see what the body does with the space that opens up. You are no longer doing anything. You are simply allowing.
- If your knees are open, close them about two inches. If your knees are straight up, open them about two inches. Stay in this position for two minutes — the tremoring may get stronger
- If you find it pleasant and comfortable, let it continue. If you find it unpleasant, slide your legs down flat, sit up if you need to, and let yourself integrate the experience
- Close the knees another two inches and allow the tremoring to come into the legs. The sensation may become increasingly strong
- Close them two inches again and let the shaking continue for as long as feels right to you
- For the last part, turn the bottoms of your feet flat on the floor and keep the knees slightly apart. The shaking will continue — allow it to move up into your pelvis and lower back
- To end, simply let your feet slide down so you are lying flat. Or roll onto your side and curl up to rest
If you stop, you can always start again
If a position becomes uncomfortable and you come out of it, that isn’t the end of the session. You can return to the position that caused the discomfort later and see whether it is still there, or whether it has dissipated on its own. Both answers are useful information, and neither one is a failure.
The tremors that arise in TRE® are not a sign that something is wrong. They are the body’s own intelligence doing exactly what it was built to do — discharging what it was never designed to hold indefinitely.
The tremors typically begin in the legs — as a gentle vibration or shaking in the thighs, knees, or calves. They may spread upward into the hips, pelvis, belly, chest, or shoulders over time. Each session is different. Some are subtle; some are more pronounced. Both are fine.
What you might notice
- A gentle trembling or quivering in the muscles — this is the tremor response
- Warmth, tingling, or a sense of energy moving through the body
- Spontaneous sighing, yawning, or deeper breathing
- Occasional emotional sensations — waves of sadness, relief, laughter, or peace
- A gradual softening of the jaw, shoulders, and belly
- Deep relaxation — sometimes accompanied by pleasant drowsiness
How to stop the tremors
Straighten your legs out along the floor. Sit up, or get up and walk around. Breathe in a relaxed way. If you need to, drink some water or splash a little on your face. That’s all it takes. You are always in control — the tremors do not happen to you, they happen with your permission, and they stop when you ask them to.
If you are new to TRE®, keep the shaking to a maximum of 15 minutes, 2–3 times a week. This isn’t a rule to grit your teeth through — the body genuinely does become fatigued, and integration time is part of the process, not a pause in it. Once you’ve learned the skills of self-regulation, you can lengthen or shorten the intervals at your own discretion. There is no minimum.
Post-Exercise Integration & Self-Care
When you are ready to finish, slowly stretch your legs out, take a few deeper breaths, and allow the body to be still. Do not rush to stand up. Give yourself at least 5–10 minutes of quiet rest after TRE®.
After your session
- Drink water — hydration supports the nervous system’s integration process
- Move gently — a short walk, light stretching, or simply sitting quietly
- Avoid heavy exertion, alcohol, or large meals immediately after practice
- Notice what changes in the following hours and days — in sleep, mood, tension levels, and how you feel in your body
- Keep a brief journal if you wish — tracking your experience over sessions can be illuminating
Adjusting your practice over time
In the first few sessions, keep things short and simple. Two to three times a week, with the shaking capped at 15 minutes, is enough. As you grow more familiar with your body’s responses — and with your own ability to slow down or stop — you can adjust the intervals at your own discretion.
When to seek professional TRE® support
If strong emotions arise and don’t settle within a day or two, or if you feel destabilised after practice, pause your solo sessions and reach out to a Certified TRE® Provider. This is not a sign that something is wrong — it is a sign that you would benefit from guided support as you go deeper.
TRE® is a lifelong self-help tool. Once you know it, it belongs to you — available whenever your body calls for it. The seven exercises are simply the door. What lies beyond them, each time you practice, is entirely yours.
Frequently Asked Questions
For most healthy people, yes — TRE® is self-regulated, meaning you stay in control and can stop the process at any time by straightening your legs out flat, sitting up or walking around, and breathing in a relaxed way. When you’re starting out, keep the shaking to a maximum of 15 minutes, 2–3 times a week.
However, if you have a history of significant trauma or PTSD, a psychiatric or psychological diagnosis, a cardiovascular or blood pressure condition, epilepsy, severe chronic pain, recent surgery, broken bones or sprains, or you are pregnant — or if you take medication for any of these — it is strongly recommended to begin with a Certified TRE® Provider before practising alone.
The tremors are an instinctive, involuntary shaking response that the body uses to discharge deep muscular tension and stored stress. They usually begin as a gentle vibration in the legs and may spread to the hips, pelvis, and torso. Shaking is not a sign that something is wrong — it is the body’s natural self-regulation at work, the same reflex seen in animals after a threat has passed.
This is completely normal, especially in your first few sessions. Don’t try to force or manufacture the shaking. Simply continue to breathe and hold each position. The tremor response is a skill the nervous system learns — with regular, relaxed practice, most people find it develops naturally over time.
While you are learning, two to three times a week is enough, with the shaking kept to a maximum of 15 minutes. Integration time between sessions matters more than long, frequent practice. Once you’ve learned to recognise when to slow down or stop, you can lengthen or shorten the intervals at your own discretion.
TRE® is widely used as a body-based tool for releasing chronic stress, calming the nervous system, and supporting recovery from trauma — without needing to talk through or relive difficult events. Many people report better sleep, reduced muscular tension, and a greater sense of calm. It is a self-help practice and not a substitute for medical or psychological treatment; if you are managing a diagnosed condition, work alongside your healthcare provider.
Very little. You need a non-slip mat or carpeted surface, comfortable stretchy clothing, and a small amount of floor space. Exercise six needs a clear wall to lean against. Bare feet are recommended, particularly for the first exercise. Avoid practising on a heavy meal — leave one to two hours after eating.
Ready to experience TRE®?
Practice with guidance
Reading about TRE® and experiencing it are two completely different things. A free 30-minute call with Anna is the simplest next step — no commitment, no pressure, just an honest conversation about what you need.